⚓️ ArgoCD Deployment
This guide will walk you through deploying an integration of the Ocean framework using ArgoCD, utilizing it's Helm Capabilities.
Please verify that the desired integration supports this installation method before continuing.
Prerequisites
- kubectl must be installed to apply your installation manifest.
- Helm installed.
- Kubernetes cluster to deploy the integration to.
- ArgoCD must be installed in your Kubernetes cluster. Please refer to ArgoCD's documentation for further details about the installation.
- The integration's required configurations.
- Your organization Port credentials.
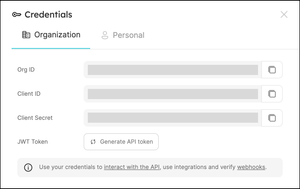
Get your Port credentials
To get your Port API credentials go to your Port application, click on the ... button in the top right corner, and select Credentials. Here you can view and copy your CLIENT_ID and CLIENT_SECRET:
This guide will install the ArgoCD Application using the current Kubernetes context. Make sure you have the correct context set before continuing.
Deploying the integration
- In your git repo, create a directory called
argocd.
mkdir argocd
- Inside your
argocddirectory create another directory for the current installation. For our example we usemy-ocean-integration.
mkdir -p argocd/my-ocean-integration
- Create a
values.yamlfile in yourmy-ocean-integrationdirectory, with the relevant content for your integration and commit the changes to your git repository:
Remember to replace the placeholders for THE_INTEGRATION_WANTED_IDENTIFIER WHICH_INTEGRATION_TO_DEPLOY EVENT_LISTENER_TYPE SECRET_VALUE and CONFIG_VALUE.
initializePortResources: true
integration:
  identifier: THE_INTEGRATION_WANTED_IDENTIFIER
  type: WHICH_INTEGRATION_TO_DEPLOY
  eventListener:
    type: EVENT_LISTENER_TYPE
  secrets:
    INTEGRATION_SPECIFIC_SECRETS: SECRET_VALUE
  config:
    INTEGRATION_SPECIFIC_CONFIG: CONFIG_VALUE
The generic configuration for integrations can be found in the integration configuration guide.
More information about the available event listener types and optional configurations can be found in the event listeners guide.
- Install the
my-ocean-integrationArgoCD Application by creating the followingmy-ocean-integration.yamlmanifest:
Remember to replace the placeholders for YOUR_PORT_CLIENT_ID YOUR_PORT_CLIENT_SECRET and YOUR_GIT_REPO_URL.
Multiple sources ArgoCD documentation can be found here.
ArgoCD Application
apiVersion: argoproj.io/v1alpha1
kind: Application
metadata:
  name: my-ocean-integration
  namespace: argocd
spec:
  destination:
    namespace: my-ocean-integration
    server: https://kubernetes.default.svc
  project: default
  sources:
  - repoURL: 'https://port-labs.github.io/helm-charts/'
    chart: port-ocean
    targetRevision: 0.1.14
    helm:
      valueFiles:
      - $values/argocd/my-ocean-integration/values.yaml
      parameters:
        - name: port.clientId
          value: YOUR_PORT_CLIENT_ID
        - name: port.clientSecret
          value: YOUR_PORT_CLIENT_SECRET
  - repoURL: YOUR_GIT_REPO_URL
    targetRevision: main
    ref: values
  syncPolicy:
    automated:
      prune: true
      selfHeal: true
    syncOptions:
    - CreateNamespace=true
- Apply your application manifest with
kubectl:
kubectl apply -f my-ocean-integration.yaml
Advanced configuration
The Ocean framework supports advanced configuration using environment variables. The Ocean Helm chart allows setting these variables using Helm parameters. This can be done by making changes to your values.yaml file and committing them in your git repository.
For example add to your values.yaml file:
# The rest of the configuration
# ...
extraEnvs:
  - name: HTTP_PROXY
    value: http://my-proxy.com:1111